Tuesday, September 16, 2014

Staying Organized: School Schedules

Happy September! To those in school: welcome back to school, everyone, I hope your first weeks have been wonderful! To those who aren't in school: I hope that your month has found you filled with many blessings and much gratitude.


Courses began nearly three weeks ago for me, but many of my friends started weeks before. (My university is a bit slow on the roll. ;) But I don't mind - more summer!) These past weeks have been a struggle. Running tally:  4 or 5+ break downs, a notebook's worth of paper, a stack of printer paper, a cartridge of ink, all of my free time, and, quite possibly, my sanity. Senior year is proving to be my most trying year yet. It's hard. I'd be lying if I said I staying 100% optimistic, but defeat isn't in my nature. Perhaps I am a bit stubborn. Believe me: defeat has been contemplated. I fancied the idea of dropping courses, of changing my career direction, of tossing in the towel and throwing up a white flag. But, let me be honest now, these frustrated, self-confidence lacking thoughts, they aren't my truth. They're the vain grumbles of an overwhelmed college senior. I mean, look at me!

Playing tourist!
In the week prior to school,
a dear friend of mine accompanied me on errands -
including stopping by my campus to pick up
my semester's books.
So, naturally, we took pictures in my school's
skywalk!
Finding gratitude in the darkest of situations is my specialty. Learning energizes me. (I could do without the homework, though. ;) ) I love my college. I have been entirely blessed with the ability to pursue an education. My professors are consistently amazing. Every hour spent buried in books, assignments, and studying has been entirely worth it. My grades thus-far have been stellar and, more importantly, the knowledge I have procured is pertinent to my everyday life and to my future practice. And no matter how much I might grumble about the studying or the homework or the group projects, healthcare is my passion. My soul is filled with many passions, but there are few I'd do for a career: being a doctor is one of them. Spreading happiness and good health - which is the key to all our dreams in life - is important to me. I love to inspire people to their best selves.

In moments of grumbles and breakdowns, I remind myself of this.

In moments of clarity, I whisper: "I am doing this to be a doctor. I am doing this to be a doctor. This, too, shall pass. The end goal is worth it." And you know what? It totally is.

When you're in college and the going gets rough, you need to focus on what is giving you the drive to get through. Remind yourself of all that is good. Find something in the struggle to be grateful for - there is always something, if you dig hard enough.

Still, to help ease my anxiety and stay on-task, I have a few tricks up my sleeves.

I am energetic, a bit bounce-around-like-a-ping-pong-ball, and simultaneously introverted. I prefer to brainstorm than outline. To-do lists are more suggestions than requirements. Drafting an essay on the first paragraph and ending at the conclusion, rather than wherever inspiration hits, brings anxiety. When I'm overwhelmed, productivity stops. I have to backtrack, find something else to do and regroup when I feel more able. In my personal life, this has served me well. In college, not so much. I have learned to adapt to survive; albeit, not always well. Sometimes it is an up-hill bicycle ride. But a girl has got to do what she's got to do! Make like nature and evolve! ;) (Biology humor for your day ;) ).

Trick #1: Organize your life.

If organizing can be your best friend, your life is made.

Meet my desk view:

I have two white boards, an academic planner, a personal planner, and a to-do list organized by academic and recreational factions. Leave no stone unturned! This is my monthly calendar. Here I can see the big picture, everything that is due in the entire month. When I took this picture, it was before a lot of my assignments were posted. None of my personal appointments or important recreational events, such as Rush, were posted, either. The space is pretty bare as a result - it never stays this way.  All major assignments, weekly assignments, appointments, events, and examinations go here. I color code the days of the week by courses and the weekends are left without color. The color coding helps me memorize my schedule.

Additionally, every course is associated with a specific color. My human nutrition course (online) is in green. My wellness education, blue. So on and so forth. If an assignment for that class were due, I'd write it in with the associated color. Black and Brown are my not-organized category. They fill in whatever my other categories don't cover, such as appointments.

This whiteboard I love because it also has space for additional notes, magnetic information holding, and a cork-board that can be used productively (you know, for things) or for holding mementos.


Add caption

Up close and personal! It was about this time that I forgot to mark down birthdays. I put mine down (shown below) and then began adding in others' - I wasn't able to get a shot of that, though.


Below is my weekly calendar. Every Sunday I organize my week based upon this. I write down everything that needs completion throughout the week and when everything is due, recreational and academic. This schedule was from Labor Day week, to show a basic idea of set-up, but the vastness of assignments and responsibilities has easily doubled.

I try to organize this as best as possible so that I have what needs to be done in an order of how I want to do it, or what is most urgent and pressing. Additionally, I try to clump together assignments for courses. That way, if I say "what do I need to do in Chemistry today?" I look for the chemistry group each day to see what I have left to do.

As I said before, to-do lists are often suggestions to me. I still struggle with them. (They are really important and helpful, though!) For example, I had a to-do list for this weekend that wasn't half-way finished by the end of it. Some assignments take longer than others which means you cannot always be Superman or Supergirl!

Starring important tasks the night before helps keep me on task, at least a smidgeon more.


My academic planner! Arguably the most important of them all. I always use the huge At-A-Glance planners. These have tons of space in their calendar sections at the beginning of the month, as well as tons of space for week-by-week use.

All of my assignments, to-dos, course times, and events go here. I write time-frames from 7am-on on the weekly sections. I then color code my classes (i.e. chemistry is orange, statistics is purple) with highlighters. For the first few weeks I block off 2-3 spaces per time period for my classes to make sure I get in my brain my course times. After that I just highlight the course name itself. Following every course name are assignments due and homework to be done for next class. Anything after the highlighted sections is extracurricular (or "recreational").


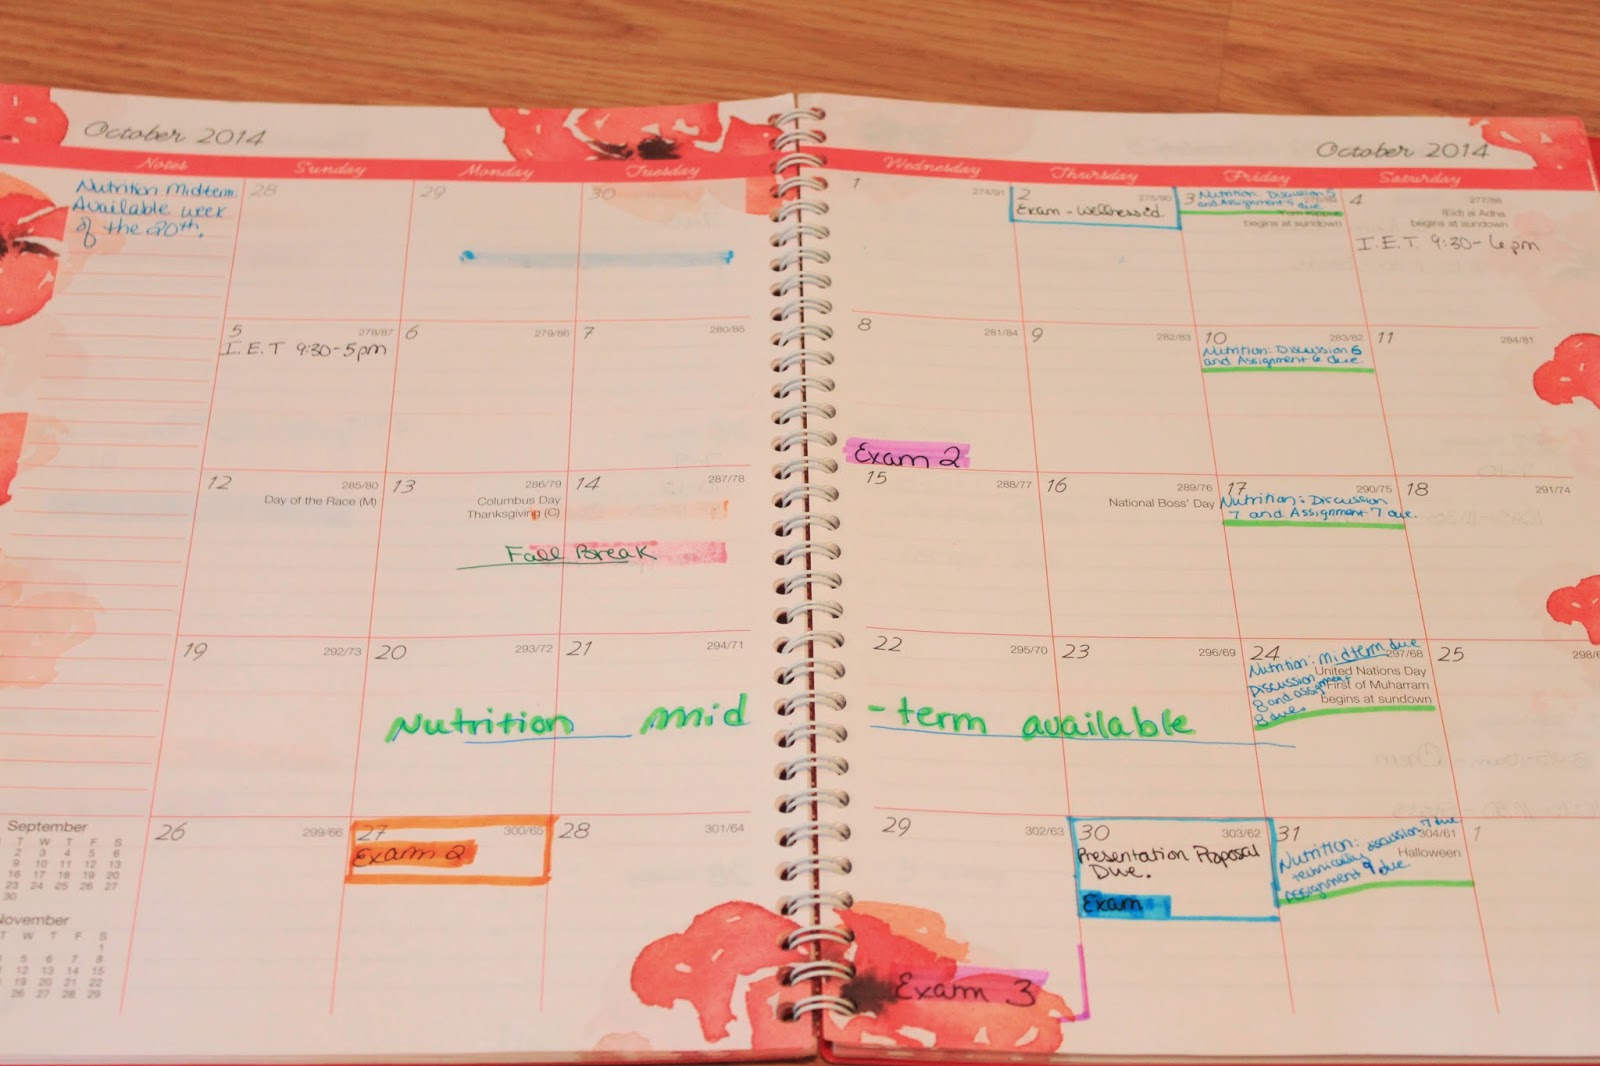
Here is the calendar portion! In order to remember when I have exams and what classes they are in, I highlight the exam #1 with the associated course number (i.e. orange for chemistry, purple for statistics). All of the major projects are written here, plus project deadlines, exams, and school vacations.


My personal planner. This is a moleskin given to me by a fellow writing buddy, but it needn't be so fancy. (Though, goodness, I adore this one so much I might splurge on myself next year.) This is small and convenient to stick in my purse and keep with me on-the-go. On the Notes side are things to do while I'm out or other to-dos (rarely homework, but sometimes!). The weekly calendar side has events for that week so that I know what to plan appointments around while I'm out. Here I include examinations and study-group sessions, because those are important to plan around.


Finally, my last portion: the to-do list. I always separate academic and recreational so I can prioritize and have clearer vision. As I complete an assignment or "to-do" I check it off or scratch it out. If I have something left to do on it after it is done (say, a question) I write it in color next to the list item. Being in color while everything else is black will assure that I do not forget it!


Update:
I haven't been able to take pictures of what my whiteboards and planners look like (honestly, I haven't had the time to); however, I managed to snag a quick picture before Recruitment of what my to-do list looks like now. It shows a good transition between beginning of semester and the heat of it. Plus, it serves as my case for future absences from this blog. I'm in over my head, guys, but I'm still swimming!

As soon as I get the chance, I will take a picture of my current whiteboards and make a new post.

For reference, I thought I'd show how my
to-do list has grown as the weeks continue on.
I've gone from a mini notepad to a large one,
in order to fit it all in. Between all of my classes,
I've easily exceeded 40 items. (For example,
there are 4 courses listed on the front sheet you see.
Another ten items are on the back, for another class.)

Keep in mind, this is weekly assignments, mostly.

And note how tiny my "recreational" list is.

Trick #2:
Take everything in small chunks. Do not let yourself stare at a long to-do list and freeze. You will cause an anxiety attack this way. Strip it down bullet-by-bullet. Peel away the layers. You can do this.

Trick #3: Do NOT think too far in advance, too often. Sometimes it is important to think about semester long assignments and it is easier and more beneficial to study a little each day for an exam, than cram the night before. But be weary! It is very easy to get stuck in this future-focused mentality which causes immense anxiety.

Be mindful in the present. Remember, as a professor of mine told us all today: "wherever your buttocks are, so should be your brain."

Trick #4: Take that mountain. Take a page out of another professor's book. Chemistry is absolutely terrifying. Studying for it makes me nearly hyperventilate. Other times I want to take my textbook and throw it across the room.  My professor is not naive to this. The first day of classes, as we were sitting there sweating buckets, she had us write a list. It was a list of great challenges we have overcome in life. Any moment that felt it was going to be impossible to achieve or overcome or get through, but in the end we did. Something that took great work and in the end we succeeded in. Anything. We're more capable than we might think we are. If we can do that, we can do this.

Mountains are not scaled in one leap.

Write yourself a list.

It is easy to get bogged down by what is going on in the now and forget what greatness lies within us. While struggling through problems and concepts, or, heck, any other life difficulty, it is important to look back and remember you've overcome challenges before and you can overcome this one. Even if the mountain feels insurmountable, it can be climbed - one step at a time.

Sunday, September 14, 2014

A Throne for Her Royal Queen of Fluffdom


This was almost labeled: "Peaches and the Pea." ;) I'm keeping that arsenal in my back pocket for a future post.

I have been on a weekend-long date with my recliner. It's been pretty swell. It's treated me well - hey, it even treated me to an all-you-can-eat homework buffet! This afternoon I looked up from some quality recliner-date time and my chemistry buffet to find this in front of me. Curled up on top of a bag, on top of an emptied shoe box, was Peaches.


On top of a box!

This is a first....but probably not the last.

The box was supposed to go to recycling, but now I feel obligated to keep it around. She really likes her new perch. (I wouldn't think it'd be that comfortable - I guess it is!) Hmm...How to make this more aesthetically pleasing...

Sunday, September 7, 2014

Green Drink


Salads are wonderful. As a gardener and vegetable lover, I love salads. In fact, if I had to write a list of favorite summer things, salads would be on it. (The rest of the year here is just too cold to eat large, fresh salads!) But I have a not-so-secret secret: my favorite way to eat my veggies is to drink them.

This past week has been unseasonably warm. Normally we're approaching fall here, which means cool, crisp September days. Our current highs have been in the upper 80s and 90s, full of humidity. In order to avoid turning on the stove - and to get cool refreshments into our system - we've been enjoying smoothies galore.  Mom doesn't usually measure quantities so gathering recipes can be difficult. (She is a master in the kitchen, an intuitive food genius - a talent that I did not inherit, except, perhaps, for pasta dishes.) But, consider yourselves lucky! I managed to get this homemade recipe off of her.

Since we use a Vitamix, I cannot promise how this drink will come out in a regular blender. Odds are, it will not be as smooth and well-blended. (Hopefully just as delicious. though!)


Ingredients:

3 large leaves of organic kale. (Remove the leafy greens from the spine and stem. Do what you will with the stem and spine of the kale - composting is great! - but you'll want the greens for this).
1 handful of organic baby spinach
1/2 organic pear juice
2 cups water
3 cups of frozen organic mixed fruit (mango, pineapples, and strawberries).

Yield: ~32oz (4 8-ounce glasses)

Additions:
My family and I are used to some pretty green smoothies. We started off with berry smoothies and progressively migrated to green, vegetable-filled ones. For us this is sweet enough as-is; however, others might find it is not what they are used to. Sweetness can be added by putting in organic honey  or increasing the quantity of berries and fruit. 1/2 of a frozen ripe banana (one that was allowed to sugar) can also be used as additional sweetener. Keep in mind with more frozen fruits used, it might become necessary to check the consistency of the drink after blending in order to thin it with more water.

I also do not recommend this drink as a meal. Often we drink this as a side to our meal for our vegetables, or the precursor to our meal, to get the digestive system going in the morning before protein. We never drink our smoothies without following with a protein of some kind. Protein is hugely important in preventing blood sugar spikes, including ones caused by natural sugars in fruits.Another thing we often do is drop in 1/2 an avocado for healthy fat. Healthy fats also decrease blood sugar spikes and help satiate you. Plus healthy fats in a diet help to maintain good nerve health. With a family history of nerve disorders and Alzheimer's, and more...I want to keep myself like a well-oiled machine. (Pun not intended, I swear! ;) ) In case you're interested in trying avocados in the drink, know that avocados will give the drink a smooth consistency and may give it a "greener" taste (although we haven't experienced this). If it is too much, add in more fruit. Eventually you'll accustom to it. My suggestion would be to try the drink without the avocado first, with any other adjustments, and then add in the avocado. It's easier to not-add than to take-away!

Happy drinking!

Wednesday, August 27, 2014

DIY: Diagonal Manicure

What you'll need:
* Transparent tape (I use 1/2" but you can use wider or trimmer, based on your preference)
* Your choice of good quality colors
and
* Your choice of clear top coat. (Not featured here.)
 Lucky Lucky Lavender by OPI Nail Lacquer, "Spirit (355)" by Revlon's Top Speed fast-drying enamel, and "Tribeca Silver (292)" By NYC's In a Minute quick-dry nail polish.

Nail polishes used throughout this tutorial:
Tipping: "Spirit (355)" by Revlon's Top Speed fast-drying enamel
Base: Lucky Lucky Lavender by OPI Nail Lacquer
Top coat: Xtreme Wear "Invisible (100)" by Sally Hansen's Hard as Nails
Detailing: Silver - by Orly's Instant Artist (art deco brush - thin long brush)
Detailing: "Tribeca Silver (292)" By NYC's In a Minute quick-dry nail polish


Lucky Lucky Lavender by OPI was used as the base nail color because it is fast drying and long lasting. (It is also a gorgeous purple.) Past manicures with OPI Nail Lacquer products have lasted a week or more depending on the wear and tear I exert, versus other nail polishes that have chipped the next day. Having a fast drying nail polish for the base nail color is very important, otherwise in order to get the results of this pedicure the painted nails would have to be left alone for several hours, or a day, and the manicure/pedicure completed at a later time when the polish is fully dry. (The base coat must be fully dry in order to not peel it off.)

Also - don't be afraid to be adventurous with color! Experiment. Mix-and-match. Go wild. Have fun! Just because I paired a color with white as an example in this tutorial, doesn't mean you have to. Play a little!


Step 1). Paint the base nail color coat.
This can be as opaque or transparent as you see fit. Be sure to make sure that each coat of color you apply dries completely before applying the next. Otherwise the polish will be tacky or dry on top but wet underneath the topmost layer of color. For this manicure, completely dry nails are a must.


Step 2). Once your nails are completely dry, cut a small strip of tape and stick it to one nail at an angle, leaving the top edge of the nail bare.


Press down on the tape across the top edge (closest to the end of your nail) to ensure a tight seal. For a more rounded line, as opposed to the straight line provided by the tape, you can use either the edges or ends of a band-aid. (This, however, is more costly - and as a college student I'm a fan of saving money. Plus, the band-aid can occasionally leave behind an excessively sticky residue on the nail, so plan accordingly.)

Step 3). Paint on the white (or your second color choice).Where you've left bare, paint on your second choice color! (For an example of what I mean, here is my last tutorial). Don't be afraid to paint outside the lines. Getting the nail polish all over the tape is totally fine! And if polish gets on your skin, you can either scrape it away with a fingernail or once done with your pedicure and it has dried soak the end of a Q-tip (cotton swab) in nail polish remover and carefully rub away the unwanted mess, pulling the skin gently away from the nail to do so, if you have to. It is a lifesaver!

If the white (or other color) nail polish used to tip the nail is not a fast drying nail polish, or is very runny in nature, let the polish and tape stand for a moment. This assures there is no dripping when the tape is removed.

Step 4). Peel off the tape

Take it slow. Peeling the tape off with a taught downward or upward angle, or straight across, can aid in getting a crisp line. Judge what angle you want to use by how crisp the line is as you pull of the tape. The most important, key-term here is "taught."


Step 5). Let dry for a few minutes and then (carefully) continue with the same process on the other nails.


Step 6). The detailing.


Tribeca Silver by NYC (sparkly silver!), silver Orly: Instant Artist nail paint, tooth picks, and a nail paint brush (purchased from Sally Beauty Supplies).  Ideally, you should take these all out before the manicure begins. Unless you're me, and then you have to dig them out with wet nails, praying you don't mess up your last coat.

Step 7). Detailing
Dip the rounded end of the nail paint brush into the silver Orly: Instant Artist nail paint. If you are a whiz with artistic nail paint and can use the brush that goes with it - go for it. I, however, cannot make a decent dot or circle with them for the life of me. (I've tried.) So this is the quick cheat for those of us not-so-talented with the brush.

Side note:
Originally I was going to use the tooth picks to apply color, too. This didn't work well for me. I couldn't get enough color or make the dots round enough. Instead, I used tooth picks for cleaning up mistakes and making touch-ups.


Step 8). Detailing
Using the end of the nail brush, place a few evenly spaced dots of silver Orly: Instant Artist nail paint along the crisp divider line between both nail colors. You could do this on every nail. I chose to only do this on every other nail, with only two nails per hand having the silver.

Let this dry.


Step 9). Detailing and top coat.

Let the dots dry. Then continue. Once dry, I used the end of the nail brush to apply Tribeca Silver by NYC (sparkly silver!) over every other silver dot. This gave a few sparkles to the nails. A bit of flare!

I let this dry thoroughly and then applied a top coat.


Tada! Your very own set of gorgeous, freshly pedicured nails. Classy, fun, and inexpensive! They are a great way to dress up - or compliment - an outfit.  While you're doing your nails enjoy your favorite dessert, pop in a movie marathon...make a Pamper Night of it! Give yourself some well-deserved TLC. You deserve it!

Saturday, August 23, 2014

OOTD: Spring into Summer


It's back! Sky is back! He's so handsome, all shiny and new. I love and appreciate (and am grateful for) my desktop computer, but it does not make keeping in touch with friends or blogging easy at all. I was way too excited about Sky's return. There was massive amounts of hopping and jumping and dancing around my room. Even many some mad giggles.

If only you could have seen the crazy-eyed, wide-grinned smile at the first few posts on my refurbished laptop. Smiling like a giddy kid, doing happy dances to blasting country music, meanwhile all of my cleaning and organization I was working on (pre-semester prep) surrounded me in shambles. My first course of action? Update a few needed blog items.

That's it. I'm addicted. Hashtag: blogger4life.

Now, I can finally catch up on posts! First up, an old fashion from this past spring. (Yikes!) Here you go:


Spring is one of my favorite seasons. (Who am I kidding? I love them all. Each for very different, special reasons.) Spring holds the promise of new life. Behind me, our beautiful rhododendron is readying for its first bloom. First bloom occurred only a few short weeks after this shoot and was breathtaking. (Photos of the sight to come!) Before the bloom, the leaves were a deep olive green and on an unseasonably warm spring day, I couldn't help but make it my backdrop. Another favorite about spring: goodbye cold and snow, hello warm and sun! Our winter was bitter freezing snow infested a commuter's nightmare long. The photographer inside swooned at all of the snow-filled photography opportunities. Everything else was praying for an early spring.

Foot pop!
So on this beautiful, breezy spring day I dressed in my newest sundress. I jumped for joy internally! For years I never owned any sundresses - jeans girl all the way! - so this year I made it my personal mission to by several. This one of them. In fact, this was my first sundress since childhood! With all of its bright yellows, white daises, and bright aqua green, I could not pass it up.


I adore this cut-out back!

While not the same color green, I paired emerald green
crystal dangles with this aqua sundress. Thinking back
to my art days, I decided this near analogous color scheme (yellow
in daisies, green earrings (which has yellow in it), and aqua green
(which has both)) would be flattering compared to anything matchy-matchy.
Nude pumps are a cute fashion must!
My nails are a homemade mani- and pedicure designed for another outfit. (Sadly, that outfit had the photograph files corrupted. I'm in the attempts to salvage them.) There will be a DIY on those soon, too! It is a really easy, elegant design. I cannot wait to share it with you!


I just had to highlight my manicure beside
the rhododendron's buds!


  • Sweater:Old Navy
  • Dress:SO bought at Khol's.
  • Belt: Part of a skirt I bought at Khol's years ago.
  • Earrings: Khol's on clearance.
  • Rings: gifts and yard sale and Goodwill finds.  
  • Sandal pumps: Solos by Softspots bought at Walmart on clearance for $6. (Yahoo, bargain buys!)


  • Friday, August 22, 2014

    You're Melon me Jealous

    I couldn't help myself.

    One of my favorite parts about summer is fresh fruits and veggies. New England does not bode well to either of these 3/4 of the year. Summer is our only season - and a painfully miniscule short one. My family and I always stock up. We flock to farmer's markets, supermarkets, and local farmers to get fresh, in-season fruits and veggies. What we cannot eat, we freeze or bake. (We eat a lot.)

    For my mother and I, our go-to summer breakfast starts off with a green drink or juice. Something quick to get a jolt of nutrients into our hungry cells and give our digestive system the ol' kick-in-the-pants start up. To make our juices we use a powerful juicer - Wolfgang Puck Juice Press - so that we squeeze the most out of the greens, veggies, and fruits used. For our smoothies, though, we use our Vitamix. We've had our Vitamix for at least 12 years and it is still kicking - I cannot imagine not having it! We use it for everything. (Homemade almond and cashew milk, homemade flours and nut-meals, soups, smoothies, and more!) It is so powerful that you waste nothing. Mom drops in whole fruits and veggies, giving us the full potency of all of its healthful goodness.

    Our beloved drinks include a apple-carrot juice or a green drink (consisting of greens and other veggies, sweetened only with an apple or some berries). Mom has gotten to the point where she does not use a recipe book. She grabs whatever vegetables and fruits are lying around and throws together the perfect combination. I bow to her culinary skills. (The only "fly by the seat of my pants" cooking I do is with grilled cheese and pasta dishes.) Every drink is an entirely new creation.

    Next to an amazing cucumber drink she made recently, Mom's latest combo is my new favorite! (Side note: I highly recommend trying any smoothie that includes cucumber - you will rarely find a more refreshing summer drink!)  This time she wrote down the instructions so we can make it again.

    Now I'm passing it along to you.

    Ingredients
    1 cup coconut water *
    1 whole small watermelon
    1 whole small cantaloupe melon
    1 whole small honey dew melon


    * While any coconut water can be used, my family and I have a favorite. For years we were forcing - or, uh, trying unsuccessfully to force - ourselves to drink several other brands. They made us gag. The didn't taste like coconut. They all tasted funky, disgusting. They just weren't good.  This one, though! Oh my goodness. Taste Nirvana's Real Coconut Water with pulp (packaged in glass) is amazing. Although it is not organic, the company does attempt to have a more eco-friendly business. Plus, it was refreshing, revitalizing, and incredibly flavorful - just like coconut water should be. My local health food store has me addicted.


    Instructions
    1. Dice the whole small watermelon, cantaloupe, and honey dew melons.

    2. Mix the three together in one huge bowl or storage container, so that they form a mixed melon dish.

    3. Place 4 cups of this mixed melon mixture into a blender or Vitamix.

    4. Add 1 cup of coconut water

    5. Blend until smooth, frothy, and well-combined. When complete, pour into glasses, kick up your feet, grab a good book and sip your way into paradise bliss! Enjoy as summer sweetness dances upon your tongue. You won't regret it!


    Serving size: roughly three tall glasses (~12oz each) of juice.

    **Drink within 24 hours to maintain nutritional benefit.

    Friday, August 15, 2014

    Guest Post: Back To School Goals


    It's coming in, it's coming in! My beautiful, wonderful Sky has officially been shipped is en route to my home. You will have bundles of post from me yet! Until then, enjoy this awesome guest post brought to you by my fellow Her Campus Blogger Network blogger, Beth. After reading this post, go to her social media links and show her some love!

    You can find Beth...
    On facebook: Wandering Forevermore
    On Bloglovin: her blog's page and her personal one
    On Twitter: here
    On Pinterest: here
    and on her blog: Wandering Forevermore


    Hello everyone! I am so excited to be sharing my back to school goals with you today. To share just a little bit about myself... My name is Beth and I blog at Wandering Forevermore. I am a sophomore transfer student at Georgia Southern University with a double major in biology and psychology. I spend my free time pinning crafts and procrastinating instead of doing them!

    I am unsure about you, but for me classes start back in less than a week. It is a scary thought and I have felt all emotions from anxiety to excitement, stress to hopefulness. I did not set goals for myself my freshman year of college which led to me having no expectations to hold myself up to... big fail on my part.

    This semester I am setting [reasonable] goals and sticking to them!


    Goal 1 - Plan my week out each Sunday
               Sunday's are easy days for me. Last semester, I used Sundays to do absolutely nothing. Even though this was nice, I do not need to allow myself to have non-productive days! So each Sunday, I will be planning out my classwork, blog needs, social life, and anything else that may come up. From this I hope to secure a sense of control of my life!

    Goal 2 - Use my agenda daily
               To be honest, I love my agenda! I practically live out of it, but I have noticed if I go a day without using it, I get far behind in my work. This semester I plan to take at least 5 minutes each morning to write down important stuff and see what all I have to get done that day or week.

    Goal 3 - Pamper myself weekly
               When life gets stressful, I notice the first thing I begin to neglect is myself. I will not get enough sleep or will begin eating healthy. I will let my nails go unpolished or fall asleep without removing my make-up. To beat this, I am scheduling in a weekly pamper session. Each Sunday, I will take time to give myself a pedicure and manicure as well as a face mask and hair mask. I know if I make this a thing I have to do the benefits will be great. I also plan to schedule one monthly professional massage, facial, or mani/pedi.
             
    Goal 4 - Stick to a sleep schedule
               If there is one thing I know about myself, it is that without sleep I am something from the devil. When my classes are done at 10am, I find it so easy to go back to sleep until 1pm. However, this completely messes up my sleep schedule so I will aim to do better this semester. A specific bed time and daily wake up time will help me loads. This goal does not mean I can't take an occasional 30 minute power nap!

    Goal 5 - Track daily fitness
               This semester I aim to workout at least 10 minutes each day (this does not count my mile long walk to class!) I also plan to track my daily fitness both on a fitness app and my blog in order to see how far I have come fitness wise from the beginning of the semester to the end!

    Goal 6 - Stick to a budget
               This was certainly something I did not do at all my freshman year of college. I blew right through my graduation money within two months of college and struggled for the other eight months. This semester without a meal plan and with living off campus I will have to work extra hard to stick to my budget I create and keep my money in check.

    Goal 7 - Have fun!
               I realize that college only lasts a short while and that I need to live it up while it lasts. While I am sticking to my goals, I also have to remember to do fun things with my friends. Spontaneous road trips and football games are things that will create lasting memories during this part of my life. I have to remember that sometimes it is ok to stray from my schedule and have fun!


    What are your goals this semester?